


 I had all the supplies around my house but just in case you don't...here is the supply list...
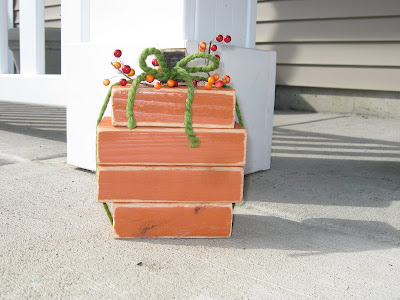
* A {2x4}. Go to home depot and grab a 2x4. They cost about $2.00. If you don't have a way to cut wood at home have them cut two 4 1/2 " blocks and two 6" inch blocks. The stem is just a piece of scrap wood.
*Gorilla wood glue but honestly you could use hot glue.
*Orange Paint. I like spray paint. It makes my busy life easy. I grabbed Kilz's Terra cotta from Walmart a while back. Any orange paint will do.
*Brown Paint for the stem.
*yarn and berries. The ones pictured are from Joann's.

Paint your blocks and sand the edges. Glue them together with the Gorilla Wood glue. Let dry. If you were me at this point I start singing the Jackson Five song...
A, B, C easy as one, two, three
Are as simple as do re me
A, B, C one two three, baby, you and me girl
Any easy project deserves this song. This isn't a requirement but hey it's kind of fun.
Tie your yarn on and arrange your berries.

Your done! So simple and easy. Some fun other potential ideas are to add scrapbook paper to the front or for Halloween add a jack o lantern face.
 I making a bunch of these little ones as invites to my Fall pumpkin/spice party. So cute. If you live by me act surprised when you receive yours!
After you make your pumpkin try out a Christmas tree!

I've added kits in my etsy store for those who are interested :)


Soooo cute! I love all of them. I love easy:) Are the berries for the tree all one garland piece or separate sprigs?
ReplyDeleteThat's so adorable! Thanks for sharing. I am adding this to my list!
ReplyDeleteVery cute and oh so easy! I might just want to try this! Oh and your music makes me smile:)
ReplyDeletelol! I was just laughing with a friend about my music. I always sing this song when September comes around :)
ReplyDeleteTrisha...the berries on the tree are separate sprigs :)
ReplyDeleteI love your site! so cute! thanks for sharing your talents.
ReplyDeleteAbsolutley adorable!!! Where'd you get your star? And what dimensions of wood did you use for your mini's?
ReplyDeletefantastic! you amaze me!
ReplyDeleteLove these pumpkins! What dimensions of wood did you use for your mini's?
ReplyDeleteThe middle piece is 1.75 inches...the other two pieces are 1.25 inches. Also the middle piece is made from 3/4" wood and the other two pieces 1/2" wood. Hope that helps :)
ReplyDeleteI cut my own star out 3/4" wood.
ReplyDeleteThe pumpkin and tree are darling! Thank you so much for sharing your ideas!
ReplyDeleteWhat are the dimensions you used for your tree? I think I'm going to make both projects for my sisters. :)
The tree is made with 2x4's...the pieces are 6", 5", 4", 3" and the stem is 2". Super easy!
ReplyDeleteYou are awesome! Thanks so much!
ReplyDeleteWe're using this for our Super-Saturday craft night in Oct. at Church! I am going to make a "pumpkin family" (one for each of us) for our mantle. This idea is FANTASTIC! You are amazing, Melinda... Headed to Hobby Lobby/Michael's for some supplies today!
ReplyDeleteSo the berries are separate sprigs? Did you buy them that way or did you cut them off of one of those sprigs that come with a bunch of "branches" on them? And did you glue them down before you glued the tree together or after?
ReplyDeleteI had this same idea with the trees but without the star/berries. I love adding those. Such a great touch!! Cute blog!
ReplyDeleteI have made 3 pumpkins and am in the process of making some trees! Wonderful decorations and gifts, thank you for posting!
ReplyDelete