Showing posts with label Wood Crafts. Show all posts

Saturday, September 3, 2011

Eye Charts and Free Printables!

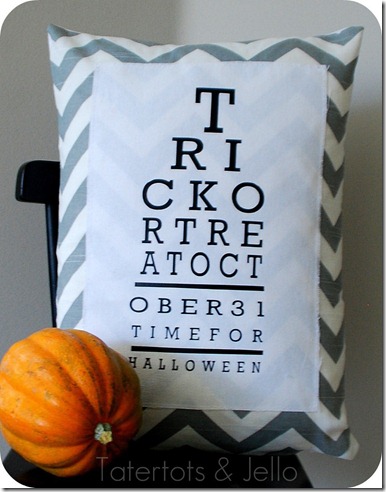
I love all the eye chart projects I have been seeing (haha).  My kids love them too.  They cover an eye and try to figure out what it says.  I found this one over at Eighteen 25 by Jen (over at Tatertots and Jello).  It's fantastic and she even gives some free printables.  I love the word FREE!
halloween eye chart pillow


I had to get in on this adorable craft.  Fall is my favorite season.  I love the colors, smells and the feeling of being cozy...My birthday just happens to be in the fall too!  Here is my fall eye chart.  Enjoy!

Fall Eye Chart

Friday, August 5, 2011

We Seek After These Things!

I've decided my favorite crafts to make are those that have a purpose.


Thanks to my friend Michelle over at Ruby Red Photography for asking me to do something with her beautiful picture.


Tuesday, July 12, 2011

WYLTC: Craft Goodies

Hey there!


 It's Wendy here, visiting my buddy Melinda all the way from Texas!
I'm so happy to be back at her place, just hanging out, sharing a  little girl talk, conjuring up a little something...we used to do it daily, now we have to do it through our blogs.


But I'm so glad we do!


 I personally think Melinda is one of the most creative people I've ever met and being able to share in her talents, in-person or on-line, I'll take any day.


On that note, let me introduce you to my take on Melinda's bird house project...


Once again, I went large.


 (I seriously think I have a size problem!)


I'm working on creating a fun, relaxing space on my back patio and needed a piece that would fit in, so the Super-sized bird house was born!


Super easy to make, and better I had all the supplies lying around my house.


(Yeah, that might not be a "better" thing...)


Anyway I used a few scrap pieces of 1x6 for the "house" part, a chunk of 2x3 for the base, and a few pieces of 1x3 for the roof line.


I took a page from Melinda's book and officially measured nothing, totally eyeballed it!


I started by mitering the ends of my 1x6 boards. Two at a solid 45 degrees and for the center piece, I found the middle and did a 45 degree cut out from there to create the point.


From there I laid the pieces side by side lining up the cuts of the roof and decided how big I wanted the house to be and cut the boards off there.


I sat and stared at the pieces for a while and decided I didn't like the house that square. So I marked off a slight angle on the two outside boards and cut it with my scroll saw.


Much better!


Here she is all cut and ready to get pretty.


The base is just a bit bigger than the 1x6's.


 To get the roof pieces, I lined up the 1x3 even with the top of the roof line on one side and cut it.


 I then laid that cut piece back into place and put another piece of 1x3 on the other side of the roof so that the top point was squared and then cut it.


(The second piece should be about 3/4 of an inch bigger than the first)


I painted and sanded each piece next.


I really wanted to emphasis that it was pieced together so I hit the edges pretty hard.


From there I nailed her all together and she was looking kind of house-y.


Big! and house-y, she stands just over 2 feet tall!


I wanted a display piece so I simple added an eye screw to the base so I could change my decor with the season or my mood.


Right now she's sporting a pretty heart bucket filled with flowers to match my patio color scheme.


I just ran a length of ribbon through the eye screw for easy changing.
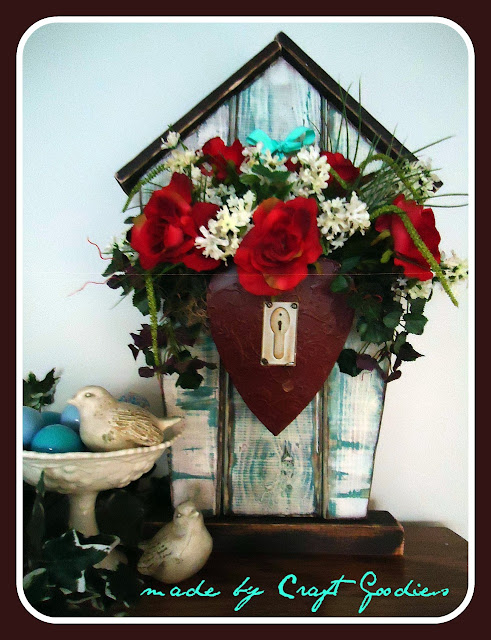


There we go! One really big, chippy, happy bird house!


Start to finish in just over an hour.


Super fun and super easy. Thanks Mel for the play date! Let's do it again soon-


Feel free to stop on over at my neck of the woods anytime.


Craft Goodies


Happy Crafting.


----------------------------------------------------------------

Thanks Wendy!  I love, love, love your bird house and it cracks me up you didn't measure anything!  Wendy is one of those crafty people who pulls something out of nothing all the time.  It amazes me!  Stay tuned for more craftiness from the gals of WYLTC :)
Tuesday, April 12, 2011

Wood You Like to Craft : Under My Umbrella Style

I'm loving the online WOOD YOU LIKE TO CRAFT group I'm involved in.  It's a online crafting group that anyone can be involved in.  Did you guys know if you make the project and link up (over at Sassy Sanctuary) you could win either a giftcard or craft kit just for making something cute?  Yep it's true.  Today I'm going to share my tutorial for how I made my cute little bunnies...

Will someone please copy my bunnies and make me feel special?!  Hop on over to Sassy Sanctuary and link up :)

A while back I did a tutorial for these distressed wood finials.  As I was sitting on my couch thinking about how I would put a spin on this project.  I found myself looking at these finials and could see cute little ears sticking out of them! (click the picture to see the tutorial on how to make the finials)


So that's exactly what I did!


I love, love, love them!!!  Here is how I put my own spin on Krystal's project.
I took the top pieces off of my already made finials.  If you would like the tutorial for how to make them click HERE.


I cut some ears out of 1/2 and 3/4 inch MDF.  Sand, paint and let dry.  I used burlap for my nose and inside of ears.


I used two different patterns for my ears.  Well actually three but the third was so ugly it won't be shown :)  Here is my pattern for the ears, nose and inside of ears.


I then Gorilla glued those cute little ears on!


Have some fun adding style with burlap!


I had my daughters vote on which ears they liked the best.  My oldest (she becomes a teenager on Sunday.  Eek!!) informed me that the ears are not perfectly straight.  My reply "Well...no bunny is perfect!"  She didn't appreciate my joke but I sure got a good laugh!


I like the chubby one!  The poor tall one was so tall he kept getting cut out of the pictures.  I might have to make him a little shorter!


Super easy and cute project. Some bunny loves you!!!

Thursday, March 10, 2011

Wood You Like to Craft....Crafty Sisters Style!

Hello!  We are Candace and Nicole from Crafty Sisters! 
We are so thrilled to be part of this online Craft Group! 
Thanks Melinda for letting us come visit and be part of your fun craft!
When we see something so inspiring it really gets the wheels turning in our heads.
We had so much fun thinking up ideas and putting our own spin on it.
Of course we had to make two of them since we each have our own style!
We love bead board so we both started with a 15" x 15" square of heavy duty (1/4") board. 
Well, actually it was a little bit bigger until the squirrel got her little teeth on it so it was shrunk a bit.....
Home Depot is so great to make cuts for those of you too nervous to use a table saw.
We then took some metal roof flashing, cut it into a square
with metal snips, to fit the frame dimensions. 
We couldn't find a frame size we wanted so we cut out some pretty trim work with the miter saw at 45 degree angles to make a square and then glued them directly to the board and inlaid the metal flashing.
Nicole used the fun tile font but a slightly different shape of what Melinda used, instead of trim work. 
Then attached the metal with spray painted upholstery tacks.
We liked the idea of the metal so that we could use magnets
to attach anything we wanted.
We are really into seasonal crafts and loved the idea of being able
to switch it out every month.
Nicole made up little shapes for each month
that she cut out of wood and covered with all her paper scraps,
attaching little magnets on the backs.
 
Candace made up some more 3-D pieces like this adorable bird nest
with it's "welcome spring" sign!
She covered her metal with scrapbook paper using glue dots on the corners
so that she could switch them out with fun papers throughout the different seasons.

Candace also then using 1" x 2" pine, framed out her bead board
using those 45 degree miter cuts again.
She then hung it from a beautiful oil rubbed bronze chain and knob.
The knob really dresses the whole thing up hanging by her front door.
Her fun butterfly magnets were a perfect touch!
Thanks Melinda for hosting this month! Krystal and Wendy, your projects were fantastic too.  We enjoyed seeing your own personal twist.  We look forward to seeing all of YOUR projects in the linky party!

Wednesday, March 9, 2011

Wood You Like to Craft....Craft Goodies Style!

I'm just going to start by saying, "This was SO much fun! And you all need to play along!


Being given a place to start + the instructions to add a piece of you to the project = a good time!!!"
 
Okay, now that that's out of the way I'll say Hello to you all.
It's Wendy from Craft Goodies and today it's my turn to hang out under Melinda's umbrella.
 {A place I dearly LOVE to be!}
Melinda did an amazing job with this first project and had the idea not been to re-create it, I may well have just copied it! But I did run into a small glitch...


The subdivision I live in places the house numbers on these big stones. They are then found on either the mailbox, or the house front. Mine of course is on the house front.


Therefore, no house number needed.  But I did want something to display it outside, so what to do?I walked outside and sat staring at my front porch waiting for a light bulb moment...


...and it came. My old, lonely bench needed a friend!


Here's how I changed things up...

1. I LOVED the shape of Melinda's so I kept it, just stretched  it out to a rectangle and went LARGE!
My piece is 22 x 27 from point to point.
 
2. I needed the piece to match the look of my bench...{old.}
 So I hand painted the border and then used a stencil to create the filigrees. Then I sanded like a crazy woman to make it look like it had been there for a while.


3. I built a flower box to go in the center of the piece instead of the castine. And added a happy little "Welcome" to it as well. Then everything got a good coat of sealer-just in case!


With the flowers added in...


Just for fun, I threw in some pillows for the bench, one with our family's initial, a red one for a splash of color, and one with my house number...I couldn't help it. I loved the idea of it on Melinda's piece and needed to get it into mine somehow.
 
So there you go, one slightly altered project from a great inspirational piece,
and one very happy front porch!


Thanks Melinda-
for continuing to be amazing and for letting me share my version here.
I'm really looking forward to seeing what else has been created and I can't wait for the next project.
Happy Crafting!
 

Tuesday, March 8, 2011

Wood You Like to Craft....Sassy Sanctuary Style :)

Hey everyone!  I'm Krystal and I blog over at Sassy Sanctuary.  I'm so excited be here for our first ever Wood you like the craft? event! 

I was so happy when Melinda announced this month's craft because I new instantly that this was going to be a solution to one of my problems.  You see, we have a solicitor problem.  In the summer especially, its relentless.  Sometimes the people that come to our door are really pushy and down right rude, and being home alone a lot of the time it makes me uncomfortable.  At one point in time I had a little vinyl "no soliciting" sign on the door but it got in the way of my wreath and came down. (Because we all know the wreath is far more important!)  My husband has been asking me to put something back up, so when I saw Melinda's sign, I new mine would be a "no soliciting" sign.

Wanna See?


Sigh.... I'm in love!  Its almost too pretty to have such a functional message.  But my favorite part is that its not subtle in the least.  Anyone who comes to my door is going to notice it and know my wishes.  Do you think it will work?  Let's hope so!

Mine is made the same as Melinda with the following exceptions.
  • I have a love affair with scrapbook paper.  I literally get sucked down the scrap aisle at the craft store and get stuck there.  (Although I've yet to use a page to make an actually scrap book.) I just adore all the patterns and colors.  So I decided to use scrap paper for my design.  The letters are also cut from card stock and all of it is modge podged on.
  • When I went to Lowes and asked for a 6x6 castine, they looked at me like I had sprouted horns.  So I ended up finding a 7x7 wood plaque at Micheal's.  Same difference really.
  • To hang, I drilled two holes so I could thread my ribbon through and have a cute little bow up front.
  • Because the majority of my sign is created from paper, I was worried about it holding up to the weather outside.  So after is was complete I sprayed the whole thing down with Thompson's water seal.  (the same stuff you'd seal a deck with.)  This gave it a water proof finish, although it does leave the sign a bit greasy feeling, so be warned.
Here are a few (okay a bunch) more pictures because I can't help myself.  


(Jeez Krystal, get a new doorbell!)

Thanks so much Melinda for the awesome inspiration.  I can't wait to see what you create!


Wednesday, March 2, 2011

Kiss Me Pattern

As promised here is the supply list and pattern for the Kiss Me project :)

You will need:
  • 3/4 inch MDF (trace letters and cut out)
  • A chair leg (got mine at Lowes where the stair railing stuff is)
  • Spray paint
  • 12 inch 2x4
  • vinyl (Pattern on 2x4 and "I'm Irish")
  • gorilla Glue
  • sand paper
If you print this pattern out on standard size paper the letters will be the exact same size as mine.

I'm even throwing in my pattern and lettering because I have been such a lame blogger lately :)


Wednesday, February 16, 2011

We Seek After These Things.....

I teamed up with my good friend Michelle from Ruby Red Photography to make this project...


She takes amazing pictures.  I couldn't be happier!


I love the 13th Article of Faith and the Temple!


This project was really easy.  I grabbed a 2x4.  I cut a 11 inch piece and 3 3.5 inch blocks.  I sanded and painted them.  Make sure you let them dry.  I sanded my edges again.  Apply vinyl.  I cut the pictures to fit the blocks and mod podged them on the wood.  Last I inked the edges of my wood with  a black ink pad.  It was that easy!!

Related Posts Plugin for WordPress, Blogger...