Showing posts with label YW Camp. Show all posts

Monday, September 6, 2010

The Gospel was Preserved Because of the Brave

The Gospel was Preserved Because of the Brave. Basically this is Book of Mormon day. This is the schedule...

In prep for camp all leaders, priesthood and YCLs were informed that they would need a costume for each theme. We as leaders brought extra costume pieces for those who forgot. There will always be a few of those. The YCLs and some leaders went up Monday and the other girls came up Tuesday. It was fun to see them arrive with us all waiting in our costumes


It was fun to see what everyone came up with.


There were two different classes that day.... Each about the Book of Mormon.


There were reenactments each day based on the theme. Some were put on by the men and others were prepared by the YCLs. They were all about the Book of Mormon. I'm just waiting permission to post some of the scripts from a friend who wrote them. Check back for those soon. It worked out perfectly because we all were already in costume.


New decorations for each theme. For Book of Mormon day we had some spears and backdrops. I made an outline and the YCLs and some great leaders helped paint them.


Each day we also had one of these....
Everyone wants to be a stripling warrior right? I thought so. I'm not an artist. I can't even draw. How the heck did I do this?! It's simple and everyone can do it! Go online and find either clip art or a coloring page of what you need. Here are some good sites for Book of Mormon stuff...


*The church website (Look in the Friend)

*http://ldscoloringpages.net/

*Sugardoodle clip art


There are so many more! Pick the one you want and print it. Go to a printing place and have them make the picture into an overhead. I'm pretty sure each church library has an overhead projector. Use it to make your picture as big or small as you would like.


For example I used this picture....


To make this :)


I traced these pictures on wood and old sheets. At first I used a pencil but I would suggest using a permanent marker. Either works. Hopefully this is helpful to you all :) Tomorrow will be Land fo the Free Because of the Brave.

Sunday, September 5, 2010

Girls Camp - The Schedule

The girls at camp need a schedule. There was so much going on they needed to know where to be when. We came up with this one with a little help from Zutter's Bind-it-all.


With a little additional help from the Cricut. Even better my sister works at a paper warehouse and gave us all the chipboard for free. If you don't have a sister like that you can go to Costco and grab the big sheets they use on their pallets for free.

Here is the schedule. If someone wants to email and tell me how to turn a document into a PDF without it making my brain hurt...I'm up for it. Until then....


Just in case you are wondering....
The Gospel was Preserved Because of the Brave = Book of Mormon Day
Land of the Free Because of the Brave = Patriotic day/ Military
The Gospel was Restored Because of the Brave = Pioneer Day
The Gospel was Go Forth Because I am Brave = Missionary/ Focus on important of girl
Every camp needs a few rules....


The girls did most of the cooking themselves this year. They would go to the kitchen, grab the food and take it back to their camp. I love the fun names for the meals the cook came up with.

A clean camp is a happy camp :)

The chart at the top of each schedule happens when you see **12:00-4:00


Some of you smart cookies might have noticed some pages are missing. They are only pages with personal information on them. At the end of the schedule book we included camp songs. Each day I made some fun decoration to go with the theme. I will be sharing those later in the week :)

Saturday, September 4, 2010

Girls Camp 2010

After an extremely crazy summer I'm back. Not only back but full of fun new ideas. I've been working like crazy on making things for my house. I would love to show them to you only one small little problem. My camera took up a bad habit...it starting smoking on me. Shocking, I know. Not only did it start smoking but when my son was taking a picture I watched it start fire for a brief second. He was burned. I took it in to be repaired but honestly I don't want it back. Long story short...no camera. When there is bad news there is always good! I haven't had a chance to share about my stake's girls camp. This will be my focus for the next few days because there is so much to share.

Because of the Brave


Each day had a fun theme.


There was a little of this... That's my cute little one's face :)

Fun new costumes each day.


Love these ladies I got to spend so much time with!

Can't wait to share all these ideas with you. My heart and soul (actually a bunch of talented ladies hearts and souls) went into this camp. It was worth every moment. Stay tuned for more ideas.

Saturday, March 13, 2010

Girls Camp - Schedule Ideas

This year I was asked to come up with a cute way to keep the paperwork together that they give out at girls camp. By paperwork I mean their schedule, menu and camp songs. One year they stapled it together and the next year they had a fabric cover. Another challenge I kept in mind is I need to make 250 of whatever is chosen for about $5o.oo

Here are some of my ideas. Keep in mind these are just the basic idea. I wanted an idea to be chosen before I spend a lot of time making it cute..

Idea #1
File folders. This idea is simple but cute.


My thought with the paper clips is they could be on the first page of each subject. Such as schedule, menu, songs. If you have a certain theme you could add paper embellishments to go with it...such as flags, bees....You get the point. Everything here can be found at your local office store except for the flowers. I just had some extra paper around that I cut out on my cricut.


IDEA #2

This idea is used with the same supplies above. Just a few folds and you have this...


There are tons of tutorials online of how to make this idea. I like this idea because you have pockets on the side you can utilize and also the paper in the middle.


IDEA #3

Idea #3 is a notebook. This is the idea the women I'm working with chose. We are going to print our theme on the front. Let's talk about how to make this idea cheap. You can go to Costco and they give away the thin chipboard they line their pallets with for free. You can also buy thin chipboard online for cheap. Check out this LINK. I did the binding with the bind it all.


IDEA #4
Make a little clipboard. All you need for this idea is the chipboard and a binder clips. I modge podged some scrapbook paper on the clip.

Tuesday, March 9, 2010

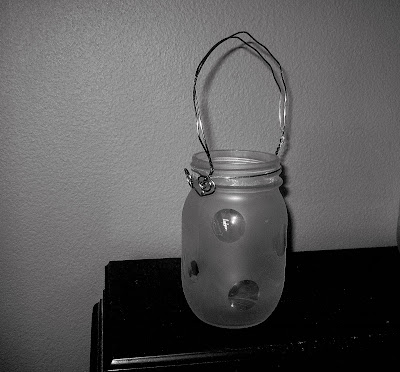
Jar lantern wire handle tutorial

Wow. That title ended up being a mouth full! I've ignored your requests long enough. Well actually I wasn't ignoring you. I have/had good intentions just not enough time. Here is the tutorial for the wire handle on the Jar lanterns we used last year at girls camp. Thanks to Wendy for helping make my movie :)


Here are a few other tips off the top of my head that I think can be helpful...
*If you can buy something at Home Depot vs. the craft store, do it. Your wire may not be as pretty but it will be cheaper.
*The thicker the wire the harder it is to manipulate.
*Make sure when you do the first step of wrapping the wire around the jar you leave enough slack so when you come back around you will be able to get your wire under it again. Needle nose pliers are really helpful. On the other side you can't have it too loose or your handle will fall off your jar. I know...you just can't win. Seriously...It's easy once you get the hang of it :)
*When I did these for camp I sprayed them first and then put the wire on. I noticed right away that when sliding the wire under to attach the handle it would scratch off the paint. I ended up sliding a small piece of cardstock under where the wire would scratch. After you slide the wire through you can take the piece of paper out. It might even slide out as you pull the wire through.

Tuesday, January 12, 2010

Courage Washers

Fun washer tutorials are all over online. I watched THIS one and knew I wanted to do something more with washers. I'm not sure if these people are the ones who came up with putting paper on the washers but it was helpful.
For the courage washers I followed my own tutorial HERE. I made mine into a necklace but there are so many things you can do! Maybe a bracelet or a key chain? Perfect for a YW activity or camp :)

If you know me you know I don't like to wait for things to dry so I did things slightly different from the video tutorial above :) I made this necklace in about 5 mins. Can't beat that. I'm *thinking* about selling these as kits in my etsy shop. The washer would be hand stamped and included. I can't tell you enough how fun this was to make. I want to make some more but now that I'm working with the scouts what would I do with them?!

Thanks to my friend Michelle for taking the pictures above. She is fabulous and I love how the pictures turned out. If you haven't gotten a chance read about her project below :)

Monday, January 4, 2010

Sad News & Camp Shirt Idea...

I had an interesting day yesterday. After about 3 1/2 years of serving in the YW presidency I was released. To say the least it was an incredibly sad day. The YW I worked with changed my life. The worst part was seeing the YWs sad little faces. I thought I was going to be fine but it was harder than expected. I'm a little sensitive about it right now so be nice! "When one door closes another one opens" right?? I look forward to another door opening but will look back on my past with the YW with a smile :)

Where does that leave our service project? After much prayer and thought I'm still going to continue with this project. I feel this is exactly what my Heavenly Father wants me to be doing...so I'm going to do it :) I will still be sending ideas and today I am going to work on some youtube tutorials for the patterns I sent out. I have also had some women in my ward with YW daughters and activity day aged daughters wanting to be included (my daughter turns 12 this
year). I'm going to meet with them once a month to teach them how to crochet and knit.

Now onto what this post was originally about....t-shirts for camp. This is an idea we used last year....

Last year at camp we were told we weren't allowed to have ward camp shirts. They were really focused on unity and thought ward shirts wouldn't help with that. Well we listened and just about every other ward had ward shirts. Our YW were not happy. I think there must have been some sort of mistake in the communication? The girls were understandably disappointed. That year the stake didn't do t-shirts either. Major bummer. So with that experience in mind we decided we are doing shirts this year regardless if the stake did them or not. The shirts will work perfectly when we are together as a ward. This is our schedule:

TUESDAY.........We're all in this together as individuals. (We are all in this together. I am an individual and bring value to the whole.)


WEDNESDAY...We're all in this together as a ward. (We are all in this together as a ward and together we are strong.)


THURSDAY.......We're all in this together as a stake. (We are all in this together as a stake and together we are one in purpose.)


FRIDAY............We're all in this together as Children of God. (We can share the Gospel and bring lambs into the fold.)

The YW will receive their shirts on Wednesday. Our ward is on a tight budget and we weren't sure we could afford printed t-shirts. So we came up with an idea. We waited to buy the shirts until they went on sale at Michaels. Then we did this...

LOL! So your thinking (or maybe you aren't) how did you do this? It was so easy and can I say FREE! Everything I did to this shirt is with supplies I already had in my house. This shirt took no talent what-so-ever because I have NONE! I grabbed some contact paper and cut out the paper dolls on my cricut. Then stick the contact paper to the shirt and used acrylic paint to paint the people and hair. The contact paper was wonderful. The paint didn't bleed at all and I could reuse the stencil a few times.

We kind of wanted to keep with the stake camp theme of WE'RE ALL IN THIS TOGETHER but still let the girls know of their worth as individuals. Each shirt is slightly different in as the girl in the center will resemble the owner of the shirt.


You may be thinking won't the paint wash off? The answer is no! My friend Wendy assured me it wouldn't and I accidentally washed one and it still looks great. One tip is to make sure to get plenty of paint on. After you wash the shirt it slightly fades but if you do enough paint you won't be able to tell! The back of the shirt will say this in big letters.....

End price for this shirt is $2.50 and that was just for the shirt! I think the possibilities are endless with this idea. It would be a wonderful way to decorate team shirts. Around here for sports the girls just get a t-shirt with a logo on the front. This year for my daughter's volleyball shirt I put BEACHELL on the back and her favorite number all for free! Can't beat that!


Wednesday, December 30, 2009

Display Pictures

Last year I made these for girls camp. We hung them on the girls bunk beds. They were simple to make. I just grabbed some string and started tying fabric and ribbon on it. I found some shower curtain rings at Wal-Mart that I tied to the ends. The YW loved them! There is something about pictures that makes the YW feel united. Maybe it's capturing the memories of good times?? I'm not sure but I do know everyone loves a good picture.


These would be a fun display for new beginnings or even YWIE :) Make memories and share them!

Saturday, December 19, 2009

Glass Jar Lantern

This is an idea we used at girls camp this past year. Our girls loved them. I can't tell you enough how much I love lanterns and even better they were practically free to make. We used battery powered tealights from the dollar store (they come two in a pack). That was for those who are worried about a bunch of YW carrying around fire at camp! Ahhh! Scary!


Do you know how hard it is to take a picture of something in the dark?! Crazy! The process of making this lantern was simple. I had a ton of canning jars sitting in my pantry. I pulled them out and cleaned them. I then cut out different shapes on my Cricut (I used contact paper). We are doing a flower theme in our cabin but I couldn't resist some polka dots! Oh I should mention you totally don't have to have a Cricut for these projects. It just makes life a whole lot easier (If you live by me you can come over and use mine). You can cut the shapes out by hand. Stick whatever shapes you choose on your jar and spray a glass frosting all over your jar. Here is a picture of the kind I used...
I purchased mine from Michaels. Bring your 50% of coupon (With the coupon I believe it's about $4.00) and it does about 25 jars. Not bad! I love this stuff. It dries within minutes and I could handle the jars. I tried another brand that was more expensive and came in a small spray can. It took FOREVER to dry (I'm not a patient person when it comes to crafts) and it also had a slight yellow tint to it. Go for the Valspar!


I do recommend you give it time to dry (do as I say not as I do!). After they are dry peel off the contact paper shapes and you are almost done. Last I added the wire as a handle. I think they ended up pretty cute. Can't you see a bunch of YW carrying these around? These lanterns would be fun as centerpieces for YWIE also!


Go HERE for a wire handle tutorial :)
Related Posts Plugin for WordPress, Blogger...