




Showing posts with label Pumpkins. Show all posts

Saturday, October 9, 2010

Pumpkin Glass Cubes

Another craft night has come and gone :) I love crafting with my friends. October's craft is glass cube/jar pumpkins. This is what I did with mine.....


I plan to put some lights inside so it will look sorta like this in the dark....


I had a little inspiration and help from some of the crafty girls out there. Craftaholics Anonymous came up with some cute vinyl pumpkins and Skip to my Lou has a free printable that I enlarged for the Jack-o-lantern face.
For my pumpkin I came up with a pattern and traced it onto a piece of scrapbook paper and mod podged it onto the glass. That's it! Super easy.


The best part about craft group is to see what everyone comes up with....


Some of the gals worked with different glass jars.


Here are the different cubes that we came up with...A fun project and good friends...it doesn't get much better than that!

Monday, October 4, 2010

More cute pumpkins

Check out these adorable pumpkins from Sassy Sanctuary....


Love them!!!

Monday, September 27, 2010

2x4 Pumpkin Tutorial

Here is a easy 2x4 pumpkin tutorial...


First, cut your 2x4's. You can also use 1x3's. They are slightly smaller and cheaper. I actually prefer them :) For this particular pumpkin cut 2 blocks at 5 inches and the other two at 4 inches. Sand the edges lightly.

Paint the 2x4's orange. I paint mine on all sides but you could just do the front, sides and top.


I used Americana's Burnt orange (above) for the pumpkin pieces and any old brown will do for the stem.


Sand the edges of all pieces.


Cut your paper into strips. Just in case you're wondering....I used a double sided paper from Graphic 45. It's in their Christmas Past Collection. It's called Deck the Halls. Ink the edges of each paper strip with a brown ink pad.


Now it's time for some mod podge!


I put the mod podge on the block and then put the paper on it. Make sure you get no bubbles (they drive me crazy) by smoothing the paper down with your fingers. I let it dry a little and then add a top layer.


Gorilla glue is the best and it's time to use some!


Use this gorilla wood glue to glue the pieces together. It will need some time to dry and you are finished! If you like add some embellishments such as ribbon, yarn and/or berries.


The best thing about pumpkins is there are so many possibilities....big, small, tall, short, wide,

or narrow. What kind of pumpkin will you choose?


Speaking of cute little pumpkins....any crafter with kids knows the damage that can be done while crafting. As I posted this post, double trouble, aka my sons, filled one of their socks up with mud and threw it at the back of the house. The little pumpkin in orange is wearing a brand new shirt. I took this picture so I can remember to laugh....someday :) Happy Crafting!

Thursday, September 16, 2010

Mixin' things up

Just mixin' things up a little bit. What do you think?I'm sure you are all tired of my pumpkin obsession....I'm doing the same thing to my tree :)
Make sure you entered my birthday giveaway!!!

Sunday, September 12, 2010

2x4 Pumpkin tutorial

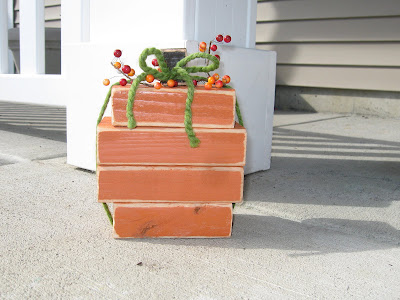
A pumpkin tutorial or as I like to call it 2x4 magic. This 2x4 pumpkin tutorial has everything a girl could want. It's cute, easy and cheap.

I had all the supplies around my house but just in case you don't...here is the supply list...


* A {2x4}. Go to home depot and grab a 2x4. They cost about $2.00. If you don't have a way to cut wood at home have them cut two 4 1/2 " blocks and two 6" inch blocks. The stem is just a piece of scrap wood.

*Gorilla wood glue but honestly you could use hot glue.

*Orange Paint. I like spray paint. It makes my busy life easy. I grabbed Kilz's Terra cotta from Walmart a while back. Any orange paint will do.

*Brown Paint for the stem.

*yarn and berries. The ones pictured are from Joann's.


Paint your blocks and sand the edges. Glue them together with the Gorilla Wood glue. Let dry. If you were me at this point I start singing the Jackson Five song...

A, B, C easy as one, two, three
Are as simple as do re me
A, B, C one two three, baby, you and me girl

Any easy project deserves this song. This isn't a requirement but hey it's kind of fun.

Tie your yarn on and arrange your berries.


Your done! So simple and easy. Some fun other potential ideas are to add scrapbook paper to the front or for Halloween add a jack o lantern face.

I making a bunch of these little ones as invites to my Fall pumpkin/spice party. So cute. If you live by me act surprised when you receive yours!


After you make your pumpkin try out a Christmas tree!


I've added kits in my etsy store for those who are interested :)

Monday, September 6, 2010

Wood Pumpkin

I'm taking a break from girls camp blogging today. I was looking at a few blogs I like and I came upon this at Brown Paper Packages...


I saw it and the first thing that came to mind is shut up. No, no, no...not like shut your mouth but like get out of town shut up. I love it. I had to create my own version.


I love how simply cute it turned out. I'm a big fan of simple. For this little pumpkin I used only the things I had at home. If I was to do it again I would use a polka dot green ribbon. I do love the yarn. There is something about yarn that is so fall cozy like but polka dots have my heart. I would also have used some smaller blocks. Not bad for a use what I have project, huh?!

Saturday, October 24, 2009

Have a pumpkin party....


Last year a few friends and I started having what we call a "pumpkin party". Each person brings one food/dessert item having to do with the theme of a pumpkin. Hanging out with friends and eating....is anything better?! Last year I made a pumpkin dip and put it in a pumpkin. This year I'm adding "spice" items such as spiced apple cider or applesauce. Yummy. These invites were super easy to make. Cut a circle out a piece of fabric. Hand sew around the edges so you can pull it together and gather it. Put a few beans and stuffing inside. Find a stick outside for the stem. Add a fake leaf and some wire. The best part about these invites are they were free to make. Crafty neighbor girl and I gathered the supplies and made them. Wanna come? If you are the NW please do (just e-mail me)!

Tuesday, October 6, 2009

Pumpkins

Last year I polka dot painted all my pumpkins. I loved them because we know I love polka dots! I was surprised that many other people liked them also. I was asked to do them as gifts for a Halloween themed baby shower. This year I have my eye on SVG CUTS pumpkin....


Even better a tutorial is provided HERE. Oh how I {heart} pumpkins!

Related Posts Plugin for WordPress, Blogger...